Runs specified console commands after PIE. Allows to manage and trigger your commands over a simple UI.
Technical Support
For questions or additional technical support please contact us per Mail or join our Discord server.
Installation
For consistent usage of a team it’s recomanded to install this plugin as part of the project; So every team member can use this tool. To do this perform following steps after you have purchased the plugin:
- Open the Epic Games Launcher and navigate to the plugin in you ‘Library’
- Press the ‘Install to Engine’ button and select the engine version that matches to you project. This will download the plugin files into you local installed engine.
- Locate the plugin in the engine’s plugin directory (usually found at C:\Program Files\Epic Games\UE_5.x\Engine\Plugins\Marketplace). Copy the entire plugin folder.
- Paste the copied plugin folder into the Plugins folder you created in your project directory.
- Open your project in UE an check if the plugin is available. Go to Edit->Plugins. In the Plugins window, search for the plugin. Check if the ‘enabled’ checkbox is set. The plugin should be enabled by default.

If you have a custom build version of the Unreal Engine it can be necessary to compile the plugin locally.
- Delete the Binaries and Intermediate folder in the plugin folder that you have copied to remove the old binaries.
- Launch your project by clicking on your .uproject file
- Press ‘Yes’ on the widget that ask for rebuilding modules.
Usage
The CmdOnPlay Plugin provides a simple integration in the default toolbar. So you can access them fast and switch configuration very easy realted to you current needs.

The toolbar entry contains two parts. On the left side the activation button (1) that controll if the plugin is active or not. Right of that the context menu (2) that provides access to the configuration of the current available commands.
Activation Button
This button toggels if the plugin will perform any trigger. It’s the general on/off button of the Plugin. Both states are visualised with differend icons.
Enabled
 This icon show that the plugin is enabled. Commands will get triggered related to the configuration when the PIE will start.
Disabled
 This icon indicates that the plugin is disabled. No commands will be triggered when PIE starts.
Context Menu
The context menu contains all configured commands and provides a intuitive interface to setup what commands will be triggered and what kind of parameters are used for it.
The menu is splitted into three major parts. If you have a bigger amount of entries a search bar (1) helps to find/filter the available list of existing command entries. Below them is the main area that list all commands that are part of a command set. Multiple command set will apear in a list after each other. In the example picture we have a DefaultCheatManager set (2). Last but not least all custom commands are listed that are not part of a set(3).
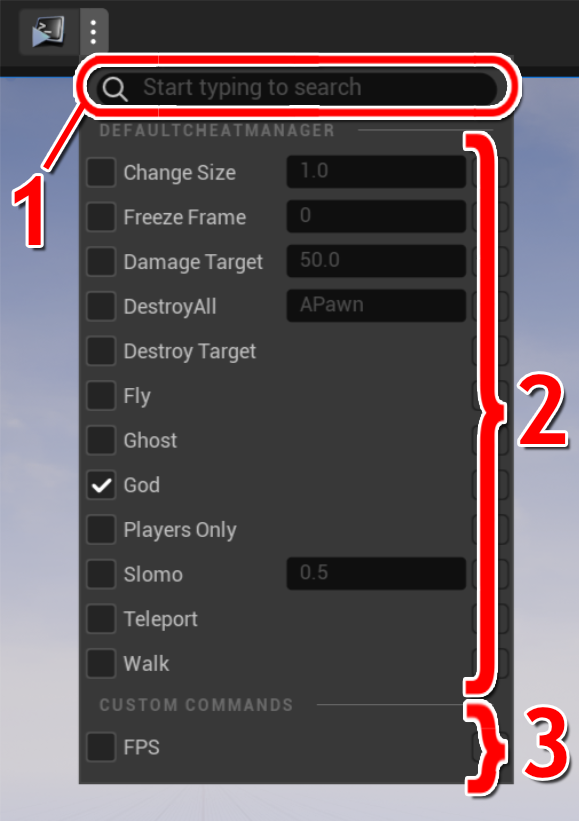
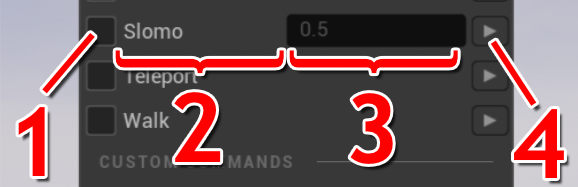
Every entry consist out of a checkbox to control if it should get triggered or not (1) and a user friendly name to identify the command (2). Optional is a field that can contain parameters if the command require one (3). If this field is empty the configured default paramet will be showen and used ifg it get performed. It’s possible to override the default one by adding a override into this field. Additionally a perform button (4) that will trigger the command immediatly. This is only available in play mode and will not concider if the command is marked active or not.
Settings
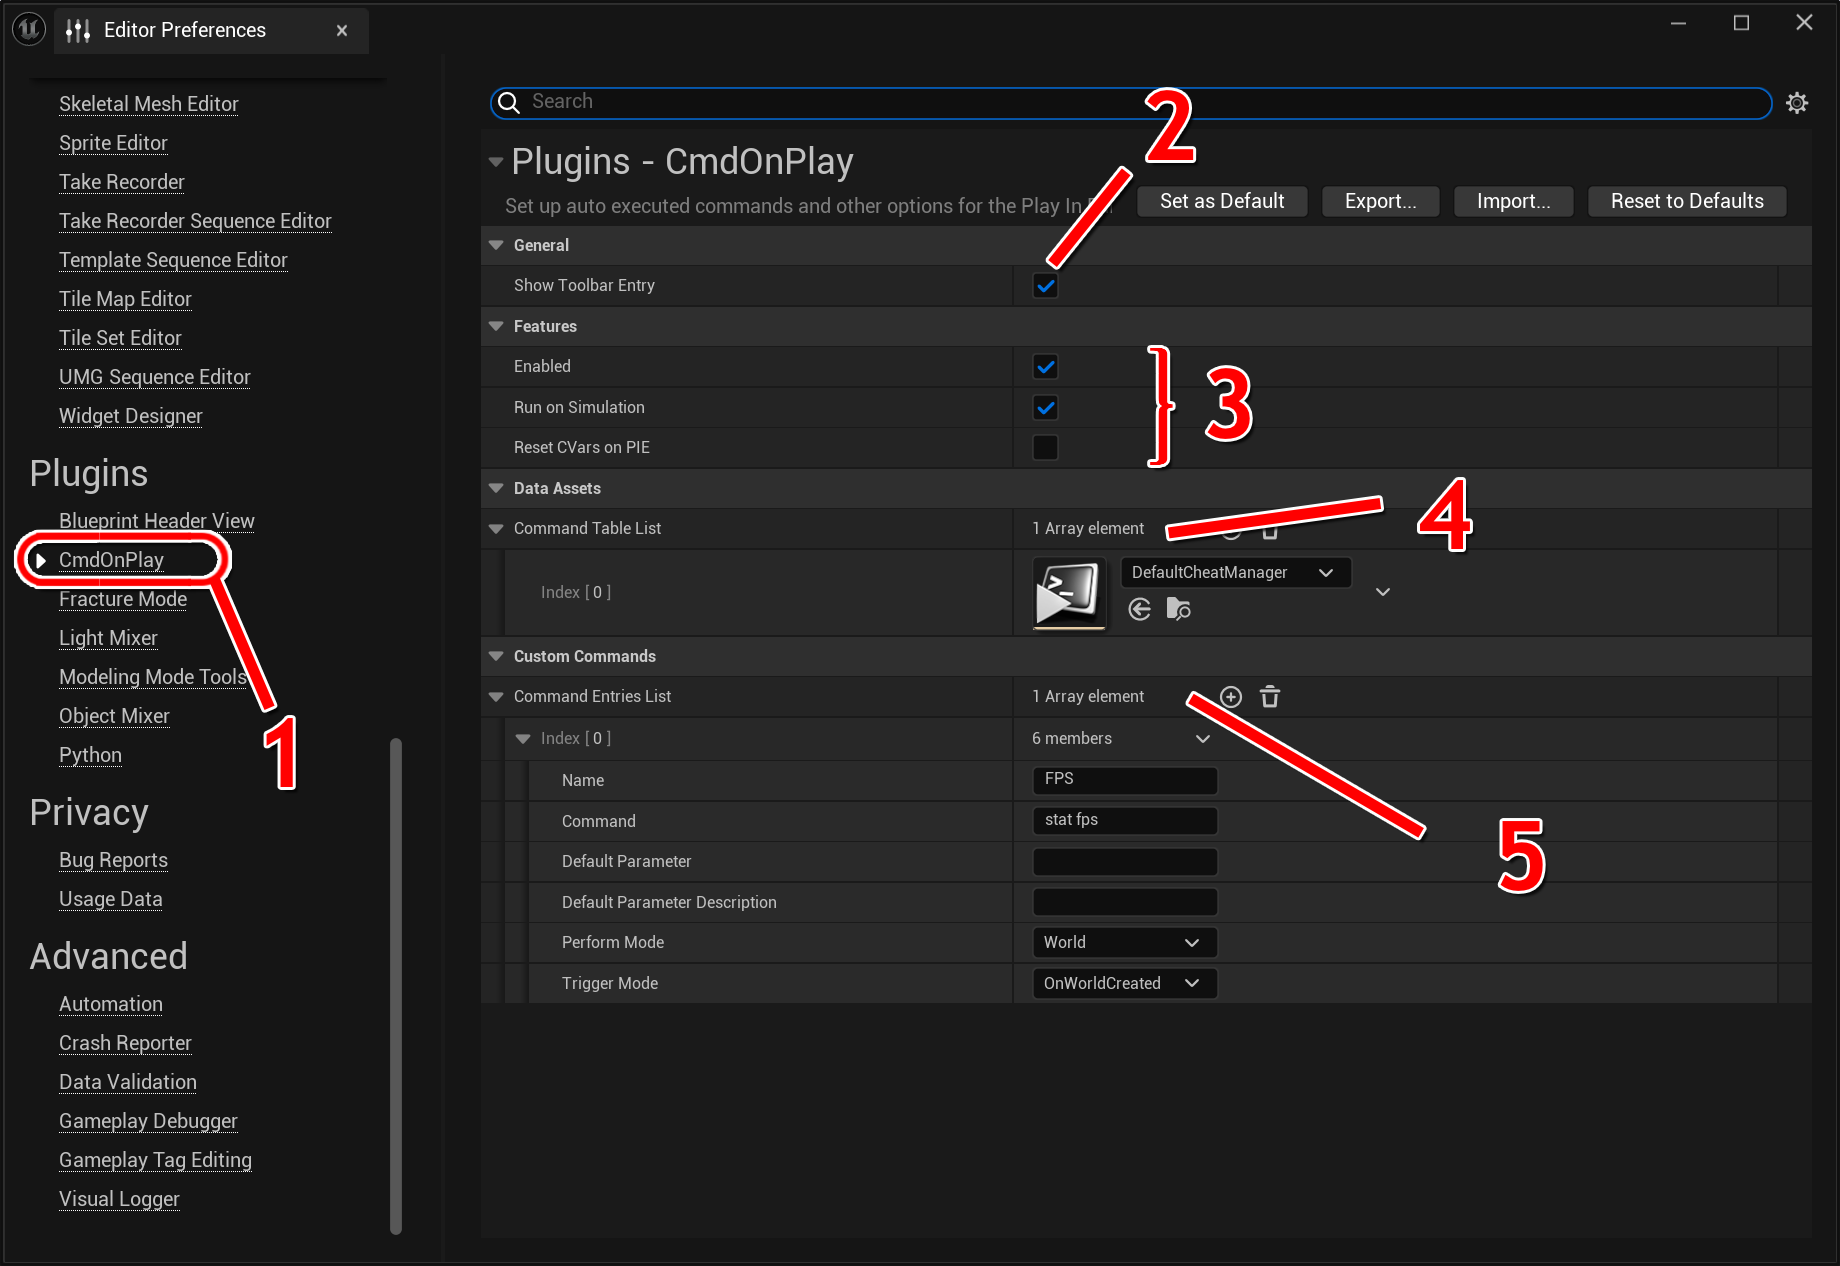
All setting for this plugin will be configured into the Editor Preferances. To start you configuration open the Editor Preferances via “Edit->Editor Preferances…” and scroll down to the Plugin section. There you can find the CmdOnPlay setting page (1).
The most setting changes require a engine restart before the got active. A Editor popup will apear if this is necessary.
General Section
In the general section of the plugin configuration it’s possible to remove the tool bar entry of this plugin (2). This is usefull for people that like to have a clean tool bar in the editor and did not like to use this plugin.
Features Section
In the feature section it’s possible to enable diffrent optional features that are provided by the plugin (3).
Enable
This checkbox controlls if the plugin will perform any triggers on PIE. It’s the same controll flag as the toggle button in the tool bar controlls. Activate it to perform selected commands on ther triggeres if PIE is running.
On deactivation the plugin will not perform any command independent from the enabled configuration.
Default: false
Run On Simulation
Define if the CmdOnPlay will be running on simulations runs too.
Default: true
Reset CVars on PIE
If this feature is enabled the Plugin will reset all detected CVars and reset them to there default state.
This will be done by checking every entry in there command lists if it is pointing to a CVar and save the default value on engine start. This value will be than rerstored on PIE. This feature can support you to keep sure that the game starts alwasy in the state that you have in mind. No forgotten changes CVars in testing sessions that interfer your next PIE run.
Default: false
Commands definition (Table List and Custom)
The heart of the plugin; The definition of the available commands that can be used. In the Command Table List get all prepared command sets linked (4) and the custom Command allow you to specify additional commands if required (5).
Data Asset (Command sets)
A command set is a data driven way to specify a syntactic group of commands. This helps a lot to unitize the workflows and provide debug capabilities on a easy way. The plugin brings a custom asset type that can be use for this. The asset type can be found in the Editor Utilities section.
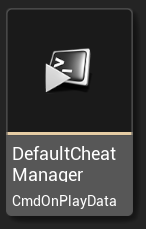
To create a new command set right click in the content browser and and navigate to Editor Utilities->CmdOnPlayData. The name of the asset than is used as name of the command set as well. Open this asset to define so many commands as you need.
By default the example DefaultCheatManager command set is linked. This one contains a couple of usefull cheats that comming with the standard Unreal CheatManager.
Basic Team Settings
On the reason that everything is configured in the Editor Preferances all users are able to configure there own setting related to there needs. All user specific changes on the setting will be stored localy in the EditorPerProjectUserSettings. So everyone can have there own sets and command without need to think about to interfear the config from other teammembers.
But it’s also possible to prepare some basic configuration and deliver them to your team. Add the [/Script/CmdOnPlay.CmdOnPlaySettings] with you decired default configuration in you project DefaultEditorPerProjectUserSettings.ini.
Example entry:
[/Script/CmdOnPlay.CmdOnPlaySettings]
bShowToolbarEntry=True
bEnabled=True
bRunOnSimulation=True
bResetCVarsOnPIE=False
+CommandTableList=/CmdOnPlay/DefaultCheatManager.DefaultCheatManager
+CommandEntriesList=(Name="FPS",Command="stat fps",DefaultParameter="",DefaultParameterDescription="",PerformMode=World,TriggerMode=OnWorldCreated)
Command entry definition
All command entries need to defined in the same way not metter if they get used in a command set or as custom command.
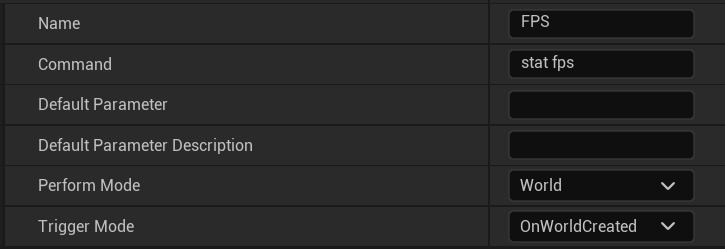
Name (Required)
User friendly specifier the identify your command entry. It’s recomandeded to be so descriptive as possible; Maybe somthing related to what happend if it get triggered.
Command (Required)
The command that will be performed if the entry gets triggered. It can be everything that can be executed from the engine commandline like Console Variables (CVars) or commands.
Default Parameter (Optional)
A default parameter that is used with the specifierd command. If a value is given the command is recognised that a parameter is available and the parameter field into the toolbar context menu will apear. This value can be overriden from the user in the context menu.
Default Parameter Description (Optional)
Hit for the parameter how it should be used. This will be shown as tooltip in the context menu.
Perform Mode (Required)
Define where the command will be executed.
Select between:
- World
- Player Controller
Triggers (Required)
For more complex projects it’s necessary to perform commands on different points in the game initialization flow. Every command get it own trigger mode. All commands with the same mode will be performed together if the point in the initialization flow is reached.
- OnWorldCreated
- OnMatchStarted
- OnPlayerControllerCreated
- CustomTrigger
World Created
Triggers after World got created. The World is allready inizialised and ready but BeginPlay() is not performed.
Match Started
Typically for multiplayer games to signal the start of a match. BeginPlay() has already performed.
PlayerController Created
Checks if the local player controller get created and is ready to use.
Custom Trigger
If you have a game that requires a more complex player character initialization workflow like a multiplayer game. If was possible that the CmdOnPlay calls the commands to early. Now you can switch to a ‘Custom Trigger’ mode to control the point in time to perform the commands in cpp.
Link the plugin in you project Build.cs like:
public class CmdOnPlay_Project : ModuleRules
{
    private string PluginsPath
    {
        get { return Path.GetFullPath(Path.Combine(ModuleDirectory, "../../Plugins/")); }
    }

    public void AddCmdOnPlay()
    {
        // Linker
        PrivateDependencyModuleNames.AddRange(new string[] { "CmdOnPlay" });
        // Headers
        PublicIncludePaths.Add(Path.Combine(PluginsPath, "CmdOnPlay", "Source", "CmdOnPlay", "Public"));
    }

    public CmdOnPlay_Project(ReadOnlyTargetRules Target) : base(Target)
    {
        PCHUsage = PCHUsageMode.UseExplicitOrSharedPCHs;

        PublicDependencyModuleNames.AddRange(new string[] { "Core", "CoreUObject", "Engine", "InputCore" });

        PrivateDependencyModuleNames.AddRange(new string[] {  });

        AddCmdOnPlay();
    }
}
You can include the plugin via #include "CmdOnPlayModule.h" in you code and trigger the CmdOnPlay with following snipped:
#if UE_EDITOR
    if(FModuleManager::Get().IsModuleLoaded("CmdOnPlay"))
    {
        FCmdOnPlayModule& CmdOnPlayModule = FModuleManager::GetModuleChecked<FCmdOnPlayModule>("CmdOnPlay");
        CmdOnPlayModule.TriggerCmd();
    }
#endif
Don’t forget to guard the trigger code with #if UE_Editor than the CmdOnPlay Module is only available in the Unreal Editor and will not be deployed into builds. Five custom trigger points are supported by default.
Limitations
The commands can be executed only on Play in Editor (PIE) in the UE Editor. Standalone runs are not supported even if these was started from the Editor. Multiplayer starts are not supported, except the PIE session.